Showing posts with label Floating Lilies. Show all posts

Tuesday, July 12, 2011

Hodgepodge Patchwork Tuesday - Floating Lilies

Do you want to make the floating flowers (Lilies)? Try them you will like them!  They are fun and easy.


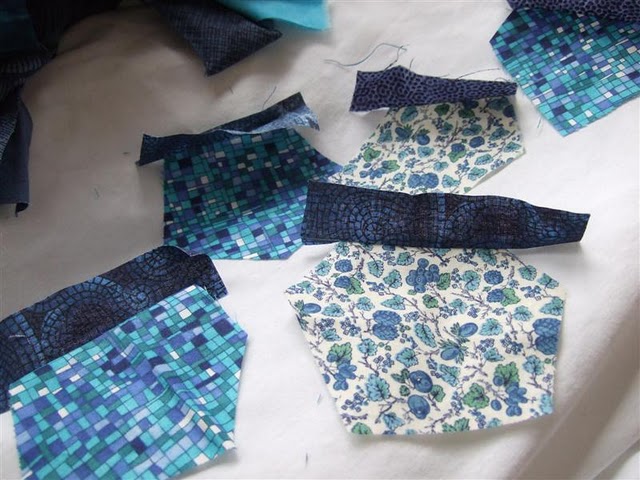
First rotary cut an irregular square -- meaning it should not be perfectly square and then cut one corner off.  
Now you should have a five sided shape - a pentagon.  You can make a six sided shape if you would like too.  Here are two photos of how I cut my 5 sided shapes.


I would suggest doing scrappy fabrics, then you don't have to keep any strips in order as you sew strips of fabric on your center shapes.  Just have fun and go with it!
Press and trim the edges like the photo above.

In the next photo, I was stitching the second side and second strip of fabric onto the shape.

I like to chain piece and switch fabrics strips, so I get a variety of colors or in this case I used all the same strip for the first side and then I chose another color for the next side. Or as I said mix it up!


When I sew my strips on, I place the last strip on the top and feed it thru' the machine first.  Then I am adding the strips around the shape in a clockwise fashion. But if you get it mixed up - just go the other way.  It won't matter.  I make at least two rounds on the shape.  On some you may want to sew a few more strips of the third row to make it rounder or more irregular.  Just have fun with it! 


Press/iron after you sew each fabric strip onto the shapes. Press and trim as shown in the next photos.  


The above photo shows how I trimmed the second strip.


The next photo shows trimming the third and fourth strips. 


Keep sewing strips to all the sides until you have rounded the shape at least twice.


Apply the Heat n Bond Lite following the directions on the label.  I cut the Heat n Bond Lite a little smaller than the piece I am going to adhere it to, so it doesn't stick to my iron or ironing board.  Then when it cools I trim it close to the paper, so the adhesive is covering the whole piece out to the edges when I pull off the paper.  This is important, because I want the flower to stay done tight on the background fabric.  It is a method of raw edge applique'.
I trimmed around each shape with a scissors to give it a wavy edge.


You can see that the paper is still on as I cut.


Lay the flowers out on your background. Peel the paper off the back and press/iron the flowers in place.


I chose a whole piece of fabric as the background for this quilt.


I think a pieced texture background would be a great choice also. 
Click on texture background for the tutorial on how to make it. 


I made the spinning spiral flowers for my yellow bag differently.  I trimmed each strip at an angle. Here is the post for this photo - How to make it - post.  And here is the post with the completed Spinning Spiral Bag.


Quilt as desired. 


I trimmed the outer edge wavy like the flowers and used bias binding to bind the quilt.


Have fun making the flowers!


Any Questions -- Leave a comment or email me at Marcia@craftysewing.com.


Have a wonderful Tuesday!
Marcia

Saturday, July 9, 2011

Floating Lilies!

I love blues.. When the challenge came out for Project Quilting, I decided I was going to make my quilt with some of my favorite blue fabrics.  
I really love blues...  I have heard that seeing the color blue causes the body to produce chemicals that have calming effects on a person.  Maybe that is why I love blues so much.  


I took this photo on my Mom's blue sofa.  I made this quilt with the idea that I would use it as a table topper, but my Mom likes it on the back of her sofa.  Both Mom and I love blues. The quilt could be used as a pillow topper on the head of a bed. It could be a wall hanging too. I just feel so calm and relaxed about it, that I would just use it anywhere!    

I finished the binding last night here at my Mom's house.  I took the final pictures this morning.  Gabby and Toby wanted to poise with the quilt too!


I took pictures of all the steps from start to finish.  I will post them this week while I am here with my Mom's house.   I will explain the construction process.  You may want to make the delightful floating lilies, so I will share it.
   Update:  Post about making the lilies.

Another photo of Gabby and Toby.


I video tapped the quilting of one of the blue lily flowers.  It is about a 2 minutes long video.


What's your favorite color?


Marcia


Some of the blue fabrics are from Chris' Dye Candy Fabrics.
Linked with:
Peaceful Life: Little Quilt Mondays Oct. 17, 2011
Sew Chatty Made with Love #47 Oct. 17, 2011