Wednesday, January 8, 2014

Project Quilting String Creation in Progress

Overnight, I came up with some more ideas, so I cut more fabric strips this morning and added in a few more yellow prints.


At lunchtime, I stitched them together.  I had drawn out a sketch and I was thinking I would make the blocks into leaves.


I made a plastic template and cut the squares into a big leaf shape. 


I ironed light Heat 'n Bond on the back of the blocks.


And I traced around the template and cut them out.


They are kind of chunkie big leaves.


When I was done quilting, late this afternoon, I stitched some more and started cutting and laying out the pieces.


I changed the plan again.  I stitched so many strips sets at and I am not liking the leaves. I decided to make a plastic template and cut out some sections for a Dresden Plate Block.


I wanted the sections to look really scrappy so I moved the template around on the strip set to get different variations.


I needed 21 sections.
Here is how I stitched the sections.


This is not really a tutorial on the Dresden Plate Blocks --- just showing you what I did.


I pressed the points and then I stitched them together and pressed both sides of the Dresden Plate Block.


I love it!


I had decided to place the Dresden Plate Block in the center and scatter the leaves around it.
 

They look too big!  Then I laid it out on a yellow print fabric.


I still don't like it. Then I split them in half.


I tried a couple different layouts.

  
I still did not like it.  They were too free form with the Dresden Plate Block in the center.


 I really wanted something to scatter around the block.  I already had put all the work into the strips for the leaves.  How can I use them?  I decided to cut them into small sections of the Dresden Plate.


I laid them out around the center block.  I like it.  But I don't love it.  I want it to look unique, but not traditional.

I guess I will have to sleep on it!


I thought I would like the plain muslin behind the blocks but I am thinking I might like a yellow print fabric or maybe strips of yellow fabrics.  (More stitching on my lunch break tomorrow).

 Any ideas or suggestions?

I know my completed quilt will be a 29" square, because I am making it for daughter's square table.  I want it to fit perfectly on the top.

I hope you are enjoying following along. I made several of changes all in one day. I need to quilt it soon. Hopefully, Friday night. On Saturday, I will stitch the binding and take photos and upload them to flicker for Project Quilting.

Enjoy!
Marcia

Monday, January 6, 2014

String Along with Me --- Project Quilting Season Five Challenge ONE

The first Project Quilting Challenge is posted.  I have until Jan. 12th, Sunday at Noon to completed a quilted project based on the challenge.  But I tell myself I have until Friday night to complete the project. Click here for the details of the Quilt Challenge. 

Here's how I make it happen - 15 minutes at a time:

I read the Challenge at Noon on Sunday Jan. 5th.  I think, I brainstorm, and I sometimes sketch out a design. But most importantly, I dream....

Later on Sunday or Monday, I gather fabrics.  


When I take breaks from my customer's quilting, I press/iron and starch the fabric and cut it. All the strips are assorted sizes from 1 inch to 1 1/4 inch to 1 1/2 inch to 1 3/4 inch to 2 inches.


I am used phone book paper for my base to stitch on the strips.


Next, I started stitching the strips diagonally onto the paper.


I chose to place the solid green on the left side on all of the blocks and any light print on the right.


Press/Iron so the strips lay nice and flat.


I stitched a striped strip on the side next to the light strip and any light print next to the solid green strip.  I want it to be scrappy, but have somewhat of a pattern using the solid and striped print to do this.


Press/Iron the blocks again.


Add more light print strips (Then Press/Iron) and then I added solid green for the last strip on the corners. Press/ Iron again.


Press/Iron and then the blocks are ready to be rotary cut into 6 1/2 inch squares or whatever size you would like.


At this point, I tear off the paper. I like to take is off and give it a good press/iron and square them up if necessary. Some quilters wait until all the blocks are stitched together.


See how the striped print strip and the solid green create a pattern. Not sure if I will stitch them together like this.  I have a couple ideas that might look really cool!


That is it for today... more tomorrow  --- only 15 minutes at a time. It takes me longer to write this post! 


I am saving the scraps in a jar and I will label it "PQS5CH1 Strings".

Hop over and check out Project Quilting and join in the fun!


Enjoy!
Marcia
String Along with Me PQ CH ONE


Getting Up Close with My Quilting - Special Area Quilting

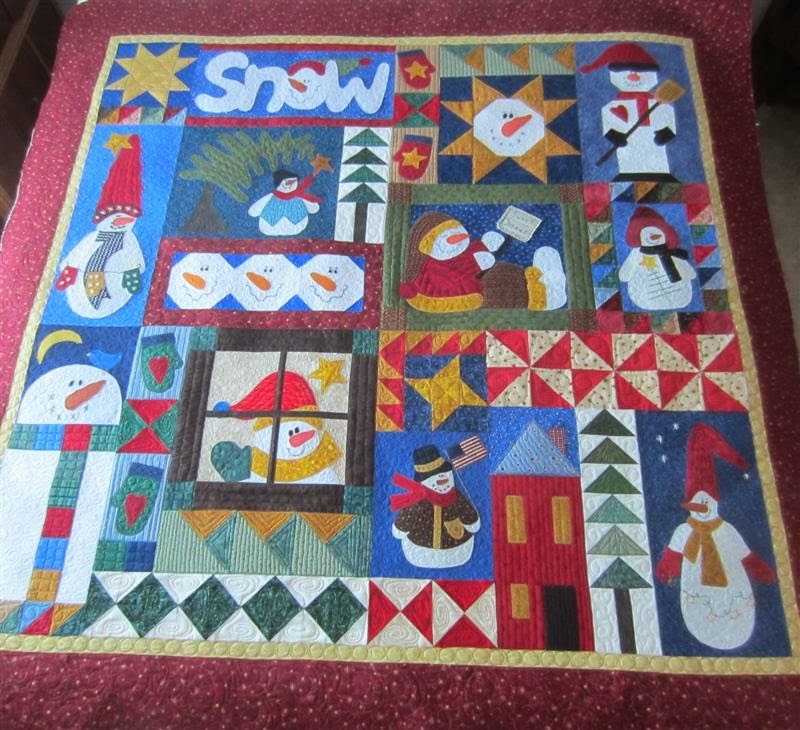
I quilted this snowman quilt in December for my customer so she could hang up for the Holidays!  Or display it on the guest bed.

Every year, about this time, another one of my customers finishes their Snowman quilt.  It was a block of the month several years ago at Picket Fence in Prairie du Chien.


Special Area Quilting gives details and dimension in just the right places.


From wiggle lines to swirls to bubbles to spirals...


I took up close photos of each block in the snowman quilt for you.


I wiggle line quilted the tree to give it look 3 D.


Using white thread, I quilted swirls and spirals on the snowman and on the white backgrounds too.


I changed threads with every color.


Double Bubbles in the thin border and Paisley Swirls in the outside border.


Circles in the mittens for texture and stripes in the background.


 Wavy lines in the hat and the window frame.


Some photos at an angle.


Here's some photos of the backside too.


See how the backside really shows you the the details of Special Area Quilting.


Special Area Quilting makes it fun and whimsical.


Rolled up and ready for my customer.


Another full view of the front.


And a full view of the backside.


Enjoy!

Marcia