Showing posts with label Lap Quilts. Show all posts

Tuesday, October 4, 2011

Hodgepodge Patchwork Tuesday --- "Up Cycle" Blue Patchwork Shorts into a Quilt!


I "Up Cycled" a pair of blue patchwork shorts into a quilt!
I used a favorite pair of shorts, but your could use a dress, a shirt, or a favorite fabric.  I cut the plaid at an angle which made it more interesting.  I had to deal with bias edges, but that was OK.  I love how it looks!


Here are the original shorts!


I used a variety of denim shirts and denim dresses for the borders strips.


Step 1
Cut squares in a variety of sizes from the shorts --- 2" to 4 ". I cut 42 squares.


Cut strips in a variety of sizes --- 2 " wide to 3"  
wide.


Step 2 
Sew one strip on one side of each block. Press and trim. You may want to starch as you press. I starch.


Step 3
Sew a second strip on another side of the center square, but not the opposite side. In the photo the top strip is the second strip. Press and trim.


Step 4
Sew a third strip on another side of the center square, but not the opposite side. In the photo the left side of the block is the third strip. Press and trim.


Step 5
Sew a fourth strip on last side of the center square. In the photo, I am sewing the fourth strip onto the block. Press and trim.


Step 6 --- Square up and sew more strips
At this point I have blocks that have four borders with one center square.  I group them into piles of similar sizes --- Large, Medium, and Small.  The large should be about 8".  Cut 8" squares from those blocks.  The medium will be between 7" and 7 1/2" .  Cut 7"  squares from those blocks.  The small blocks will need another strip or two sewed onto them. 


The block on the bottom left is a large block (8" square).  The bottom right is a small block that needed another strip and is (7" Square).  If any of the smaller blocks aren't large enough, sew another strip onto them.  You can sew strips to make them into an 8" square block. 

Step 7 --- Count your blocks 
I started with 42 blocks.  There will be 6 blocks across by 7 blocks down.  Which means you need to have 3 rows of 7" blocks (total of 21 - 7" blocks) and 3 rows of 8" blocks (total of 21 - 8" blocks). 

Step 8 --- Lattice strips (darker fabric - cut 3" wide)
Sew a lattice strip to the top and the left side of every 7" and 8" block.  I will look like an "L" on each block. I chain piece using long strips, as I don't cut my strips to the exact length. They stretch and pull a little. Press and trim.


Step 9 --- Sew the rows
Do not line them up evenly.  I trim an inch or so off the top of one row to make them uneven that way the seams don't line up.


Step 10 --- Add more lattice and trim the ends
You will need to add a lattice strip to the bottom block on each row.  Also add lattice strips to the right side of the last row on the right.  You can put them on each block or just sew strips together in random order and sew it on all in one strip.


Step 11 --- Add Borders
I used more dark strips, but do whatever you think is eye pleasing. I randomly sewed the leftover dark denim strips together and sewed them onto the sides and onto the two ends. On two of the sides I sewed an extra border. Do whatever looks best.

Step 12 --- Quilting and Binding - as desired.
I quilted my quilt with a two color ribbon quilting with whimsical daisy flowers.  I used a washable wool batting to make it a warm and cuddly quilt for this winter. The backing fabric on my quilt is a blue dyed extra wide fabric. I will bind it the same blue dyed fabric.


I am pleased with my "Up Cycled" Quilt! 
I think this would be a great memory quilt using special clothing from a loved one.

Thanks for all the suggestions along the way, as I posted about the process.  

Will I do another one?  YES!

Are you going to make one? ? ? 

Thanks for following along...

Marcia


Visit Marcia Wachuta - Crafty Sewing and Quilting's Craftsy Pattern Store »
Linked with:

Friday, September 2, 2011

Binding on the Denim Shirt Project


Cut a strip of fabric 1 1/2 inches wide. Press in half and stitch with an embroidery stitching onto the edge of the quilt on the folded edge of the strip.  See photos.  


Snip with a scissors about 1/4 inch apart and about 3/8 inch deep.  I am camping and we don't have a washing machine, so I took a wet washcloth and ruffed up the fringes and shook out the loose threads.  When I am back home, I will wash the quilt in a washing machine and dry in the dryer --- Emptying the lint screen about every 10 minutes or so, depending on how much it frays.


It's a fun raw edge binding!


Next post the completed "Denim Shirt Project - My Vacation Project"!


Enjoy your day!


Marcia

Wednesday, April 6, 2011

Hodgepodge Patchwork Tuesday (Wednesday) - Part Two - Turn a Quilt into a Bag

Update:  This tutorial is now available in as a PDF Downloadable Tutorial.
Click Here is the link to all of my PDF Downloadable Patterns


 Part Two  side seams, inside binding for side seams, and pockets and bottom tucks

Place pretty sides together and stitch both side seams. (1/4" to 3/8" seam allowance).
Inside pocket  - bind top and bottom

If you want an inside pocket, follow the next few steps before you stitch the side seams.  Pocket will show on the photos, so if you aren't adding pockets note that you will see them in the photos from this point on.


Bind the top edge and the bottom edge of the pocket.


stitch side of pocket to body

Then place the pocket on the body of the bag close to the top just below the straps.  Note: your sides seams are NOT sewn yet.  Stitch on the sides and on the bottom edge of the pocket to attach it to the bag inside.

Also stitch thru' the pocket to divide the pocket into sections. See next couple photos.

stitch bottom of pocket to body


stitch to divide pocket into sections

stitch some pockets shorter for pens and finger files


stitch the sides seams

Binding for the inside seam
Stitch a binding strip on the inside seam. (3/8" seam allowance) Leave 1 1/2" stitching out at the top edge.  Do this to both side seams.  See the next photo for trimming the bottom edge about 2 1/2"to 3" from the bottom.


Trim binding about 2 1/2" to 3" from bottom


First part of binding stitched to inside of bag


Flip over to stitch and trim see next photos...


Trim bulky spots so the binding will be able to wrap around it


Fold top edge of binding down and stitch see next photo...


Stitch to tack top edge of binding down


Fold over the binding and pin see next photo


Pin in place before stitching


Stitch the top edge of the binding see how much on next photo


Stitch about 1 to 2 inches to tack down top edge of binding


Then pin and stitch the binding from the bottom edge to the top.


The bound seams should look like this
Stand the bag upright so you can make the tucks in the corners


Pin the tucks for the corners flat so you can stitch across to form the bottom tuck


Stitch twice and then cut away the extra

Trim the excess bulk at the seam


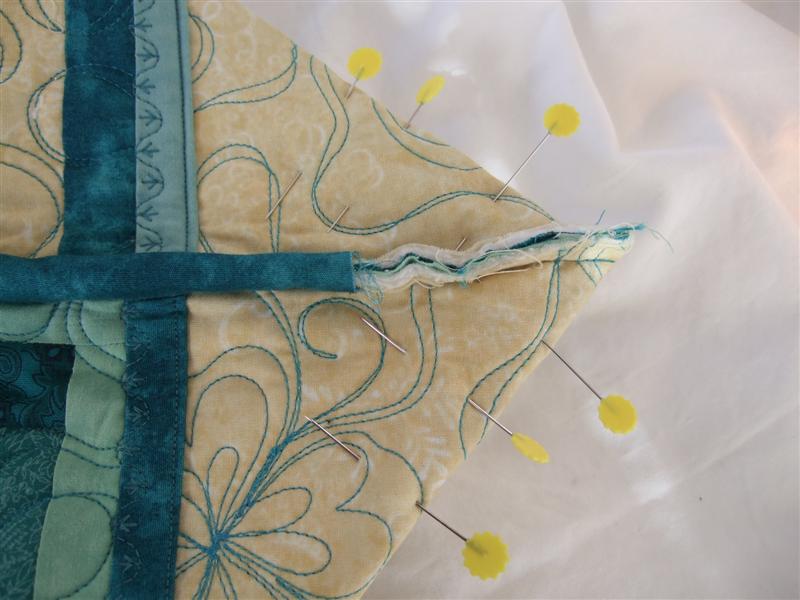
Stitch a binding strip on the trimmed tuck with 1 1/2 inch sticking out on both ends


check if it will fold over - trim if needed


fold over and stitch/tack both ends down


fold over binding and pin in place and stitch


Stitching should look like this


Turn bag inside out and your bag is completed!


I will do another post tomorrow night with several measurements for cutting and finished bags.  This size finishes to a bag that is about 11 inches tall and about 11 inches across and has an 8 inch wide opening on the top. See the photos below.

The original quilt was made using my Easy to Sew Quilt Pattern.  It lets you create an artsy type of quilt without figuring out where the colors and pieces should be placed.  Fun and easy to make!

Special orders contact me at Marcia@craftysewing.com

Any questions contact me at Marcia@craftysewing.com


Info about April Giveaway next post!