Showing posts with label Tutorial. Show all posts

Wednesday, November 16, 2011

Tuesday, November 15, 2011

Hodgepodge Patchwork Tuesday - Do You Need Help with Nomophobia?


This will help you to NOT have Nomophobia!


Nomophobia as defined by Wikipedia is the fear of being out of mobile phone contact. The term, an abbreviation for "no-mobile-phone phobia", Read the rest of the definition at Wikipedia.


Make this little cell phone necklace and keep your phone with you at all times!
Tutorial today is mostly photos with just a few words.
Size of quilted fabric - 1/2 inch wider than your cell phone and twice the length of your phone.
Binding strips - 3" wide X approximately 55". Press it and fold in half. Straight grain cut with straight seams.
3/8" seam allowances when attaching the binding.


Embroidery stitch each end of the quilted fabric piece.
Fold in half with pretty sides out. Stitched closed on both sides.  Leave open at the top.
Attached the binding to form the necklace strap for your pocket purse. Seam allowance 3/8". Leave about 1 inch extending.
Measure at least 35 inches from the edge of the purse to the other edge of the purse. You could hold or pin it so that you can measure around your neck for the length that is correct for you.

Stitch the other side as shown in the photo leaving about 1 inch extending at the bottom of the pocket purse on both ends.
Press the edges of the necklace part as shown in the photo about 3/8" turned under.

I took photos of this part of project on how to finish the ends using white binding, so you can see it clearly. 
First fold down as shown in the photo below. I pin it down to hold it tight until I can stitch.
Stitch to hold it in place.
Then fold the binding and bring it around to the front side of the purse.
Stitch as shown in the next two photos below to tack or hold the binding in place.

Then sew the embroidery stitching to seal the binding, starting at the stitch tacked end on the bottom corner of the purse.  Then stitch up to the necklace part of the binding and embroidery stitch on the necklace binding. Then back down the other side to the bottom of the purse.
Bring the binding around to the front and embroidery stitch it to finish it and stitch with the embroidery stitching all the way out to the necklace part.
Now you will never be without your cell phone!


Enjoy!

Marcia

Linked with:
Chef in Training: Tuesday Talent Show - Nov. 15, 2011
Today's Creative Blog: Get Your Craft On - Nov. 15, 2011
My Uncommon Slice of Suburbia: Tuesday's Treasures - Nov. 15, 2011
Savvy Southern Style: Wow Us Wednesday - Nov. 16, 2011
Somewhat Simple: Strut Your Stuff - Nov. 16, 2011
The Thrifty Groove: Thrifty Things Friday - Nov. 18, 2011
At Picket Fence: Inspiration Friday - Nov. 18, 2011
2805: Potpourri Party - Nov. 18, 2011
Stuff and Nonsense: friday's unfolded - Nov. 18, 2011
My Repurposed Life: Catch as Catch Can Party - Nov. 18, 2011
Roca and Company: You ROCK Party - Nov. 18, 2011
Manic Monday: Sew Happy Geek - Nov. 21, 2011
Sew Chatty:  Made with Love #52 - Nov. 21, 2011
Happy Quilting: TNT Trying NEW Things - Nov. 24, 2011
Sew Many Ways: Sew Darn Crafty #42 - Nov. 28, 2011

Tuesday, June 14, 2011

Hodgepodge Patchwork Tuesday - Welcome Wall Hanging and Giveaway!


Why would you make a "Welcome" wall hanging?  Because you want to welcome your friends and family into your home or place of business.  I needed one for my quilting shop. This was a fun wall hanging to make.  I just had some "free form" fun drawing and cutting out the letters and flowers.

First I chose my center white fabric.  Then I sewed a black and white border fabric around the white fabric.  I cut the black and white fabric askew, to kind of give it an off center look. 

I drew out some letters on the wrong side of lite heat and bond, so they would come out facing the correct way.  Then I ironed the heat and bond to the black fabric and let it cool. Then I cut out each letter, pealed the paper off, and placed the letters on the white fabric.  When they were all in place. I pressed with the iron to adhere them to my fabric. This is a raw edge applique  method.  
I did the same thing with the cornflower.  You could draw any type of flower.  I chose the cornflower, because I can draw it.  Daisies are easy to draw too. I made three flowers in different sizes. I used a black dotted fabric for the centers of the flowers. Picked a place that was eye pleasing and pressed them onto the fabric. Note that the bottom flower overlaps into the border.  This helps the off center look of the whole wall hanging.
When I quilted the wall hanging I used a poly batting, so the cornflowers puffed out a little bit.  It gives it a 3D look when you stitch on the edge of them and stitch a denser stitching in the background.

I added a sleeve on the top when I did the binding.  I pushed a wood dowel thru' the sleeve and used black ric rac to make a hanger with ties hanging down on the sides.


Follow me and leave a comment to enter the drawing.   

Drawing will be Monday, June 20, 2011 at 6pm CST! 


So in conclusion, Welcome to my blog! 

Marcia


There is still time to enter the Double Double Quilting Giveaway .  It ends June15th.


This giveaway is now closed.  Thanks to everyone who entered!  
Check the Giveaway and May for Me page for the current Giveaways.


Thursday, June 2, 2011

Thursday's Thoughts - Birthday Cake, Birthday Cards, and My Mom's Birthday


Red Velvet Cake - Photo from Wikipedia
Update on my Mom:  First thanks for all the emails with such kind thoughts and prayers.  My Mom is getting better everyday.  I will go to her hometown on Friday morning and have lunch with her at the Sub Acute part of the hospital. After lunch, I will help with her transition home and I will stay the weekend.

Mom's birthday is Saturday.  She will be 77!  We will have a small family celebration at her home.  We all love Red Velvet Cake, so I suggested we have that! It has a butter cream frosting!  My Mom would always make it for my brother's birthdays in April.  It was really a special treat, as it was quite a process to make it.  It is not your basic cake. I am not going to make one.  We have found a place to buy it.  Remember I quilt and sew --- I don't bake or cook!  But I do like to eat!


This is a Birthday card I made several years ago for a friend.  I used my embroidery machine to make the words for the card and then tore the edges, so it would look frayed.  Then I stitched them onto the card with a zig zag stitch.  I placed a small piece of double stick tape behind each one to hold it in place when I was stitching.


More Birthday cards...

I shared these today, because you can go to a store and buy a card for someone, but when you make something ... you give away your heart...


My Mom and I would spend hours making these fabric cards on our weekends together.  It was always fun to see how they would turn out.  Sometimes I would think they weren't perfect and my Mom would say they don't have to be perfect.  That's what makes them unique.
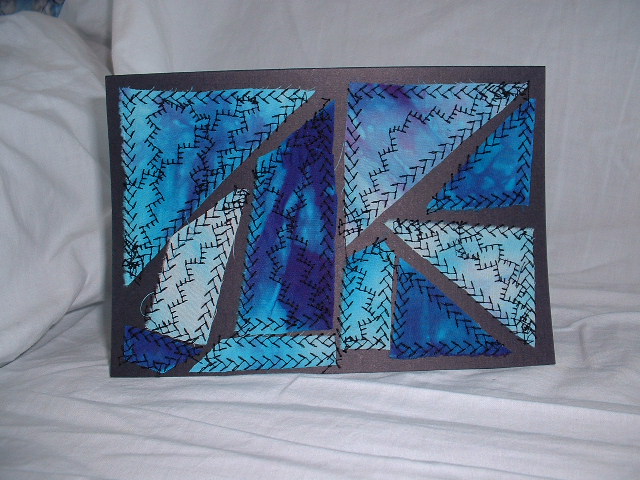
So save those little corners and scraps from your quilts and just stitch them onto a card stock.  You don't have to be an artist.  Just place them on and stitch.  You also don't have to have an embroidery machine to make the words.  Just write them!


On this card I used a feather stitch and another type of feathery zig zag.  I stitched around the edges and on the fabric pieces too.


This one, I used a leaf embroidery stitch and the feather stitch.


I really enjoy making the cards for family and friends.


I hope this inspires you to use all your little scraps and give your heart to your family and friends on their birthdays.


Don't forget to enter the drawing for the Double Double Quilting Giveaway
2 winners and 2 prizes! Please share it, tweet it and blog it!   
Thanks!   Marcia