Showing posts with label Guest Post. Show all posts

Wednesday, May 27, 2015

May for Me - Guest Post from Carolyn!

Hi I am Carolyn Meuser.

How special to be invited to tell my story here at Marcia’s May For Me Event.  But just as I began to think about it, unexpected distractions, interruptions, and disruptions took a lot of attention.  Now suddenly it’s way past mid May!  

But there was one happy project amidst all the confusion – making tote bags for three lovely ladies in my family for Mother’s Day.  I just had to make an extra for me.  It’s a handy size with 4 x 12 base.


 I love to give gifts, and I had been thinking a lot about gifts as I was making the totes.  Sometimes, I know just what is right for someone and just happen to have it on hand.  But usually the intention and the idea are waiting for the reality to catch up.  Maybe there’s just the intention and no time to wait for the idea or inspiration and no time to shop.  Maybe there’s no time to comb through supplies on hand if an idea does come to mind.  No time to make something.
I suspect everyone can recall gifting experiences and the frustration and maybe even desperation of coming up with a gift on to short a notice, and wondering if it would actually be welcome.  After all, so many people do already have a lot of stuff.

So I thought of starting a trend – a gifting wall.  I even thought of making it a regifting wall, because I've often noticed people enjoying regifting, both on the giving and receiving end.

I first got the idea from a friend who was facing a cross-country move.  She had set up a shelf on a screened in porch to display the giveaways.  Partly it was a fun social thing for anyone visiting to view the knick knacks, dishes, etc. and share their history.  And partly it was to offer a gift of whatever someone might express interest in.

I thought the concept of a gifting wall could even be expanded to a lending library of stuff.   It could be pictures and wall art available to lend if you didn’t want it taking up space, but no one was ready to acquire it for sure.

I have appropriated some shelf and wall space primarily to display gifts as I make them and have them available to offer when someone admires them.  I already did that with some little stuffed owls.  I had sent red and orange ones to grand nephews and nieces.  Later, when they were here for a visit, the little girls, 3 and 6, spotted lavender owls.  They played with them off and on during the evening.  The girls even had one in hand as they were leaving.  The 6 year old, with little sister by her side, explained to me that they didn’t have any owls that color.  Of course, they went home with the lavender owls.

Whether for gifts or just a sewing and craft activity, there are many possibilities with fabric and thread.  As you know, loving fabric and thread can lead to accumulation.  It’s been great to try complex projects with quilting and embellishment and learning special techniques.  But it’s always tempting to acquire fabric and thread faster than I can create.
  
I've come to realize that I need to transform my stash into useful results, and that has now been leading me away from the intricate, exquisite projects.  I’m trying to focus onto more practical items that are less time consuming.  So that’s my current direction as I think about replenishing the gifting wall.  I’m trying to make a big dent in my stash by doing what’s practical and simple and quick.  Maybe it’s something I'm doing for me to avoid the stress of last minute gifts.

For a lot of quilted gifts that need to be made quickly, I use what I call the Basic Potholder Method.  It’s what has already been done by everyone; I just gave it a name.  It works for table mats, runners, placemats, coasters and mini quilts, and camper quilts, as well as potholders and full size quilts.  And it avoids the tedious, time consuming task of binding.  It’s a method I like to share with a beginning quilter, especially a young child.  A small project like a potholder is sometimes a good project for a beginner.
I like to select attractive fabrics for a pot holder top and backing and place them right sides together.  Then add batting to complete the sandwich.  Stitch around with a ¼ inch seam allowance, leaving an opening at one end to turn.  Trim corners to reduce bulk, turn, whip stitch opening closed, and top stitch around the edge.  Machine quilt with some straight or decorative stitching, and the item is done.  Pot holders like these four were made that way.


Two fat quarters can be used to make six pot holders 7 x 9 inches, using whatever batting you choose.

Potholders are such a basic part of everyday life. Someone’s always reaching for a potholder whenever they're in the kitchen.  We have a drawer full, right beside the oven and microwave stack.  Easy to flip through.  You can just take your pick, thick or thin, large or small, and move on to serving “somethin lovin from the oven.”

Some folks are into scrapbooking, creating albums of memories of wonderful events and experiences.  Quilters make memory quilts to capture the essence of a family time or event.  I thought how I have a drawer of potholders – some associated with favorite people or pastimes, some with holidays, some have favorite colors or designs and stitching, and some are merely utilitarian.  All of this led me to the conclusion that you can tell a lot about a family by observing their potholder collection.

Anyway, I'm thinking pot holders make great gifts!  And so I keep making them for the gifting wall.  I always have a few minutes for sewing on a quick and easy project.  So here’s what I decided to do.  I want to be ready to make use of those minutes to use up and sew down my fabric and thread stash by going with simple and efficient construction.  I know I have some pretty half yard and yard cuts.  I'll get fabric and batting pieces and the right color thread ready to machine stitch whenever I have a little time.

Now that we're into the May For Me Event, I'll be looking through my stash to pick out some favorite fabric to make potholders especially for me.

Sometime earlier in 2014, I ran across Marcia’s blog post about mini quilts, and I discovered the concept of coasters and mug rugs as mini quilts.  I also ran across a little paper pieced block that had been waiting a long time to be finished.  It got a frame and was quickly turned into a mini quilt.


I liked the mini quilt idea so much that I began making a mini quilt to send in my greeting cards, thinking it wouldn’t just be tossed in the waste basket, but would be kept and used.  It would remind friends that they were thought of.  A mini quilt can be sent in a card with a first class stamp, if it meets the envelope size and weight limits, is flexible, and no thicker than 1/4 inch.  I keep greeting card stock on hand, so I can even send a mini quilt in a blank card with a note when there isn't time or inspiration to create a card.  Scraps too pretty to throw away have ended up in mini quilts like these aqua floral coasters.


A remnant of a crazy patch print yielded this set of coasters for use at holiday time.


For 4th of July, I made a set of coasters for my sister-in-law and her mother.  Later, I made some more elaborate pieced coasters and added stitching with decorative threads. The pattern used for that blue paper pieced block is from one of Carol Doak’s books.  I liked it so much, that I used it for this block that I attached to the back of a vest.


I had planned to get back to some free motion quilting during May For Me.  As I was getting ready to cut some plain white fabrics and low loft batting to make small sandwiches, I noticed that both fabrics had fringed selvage edges, which can be used to frame fabric art.  In fact, that’s what brought the vest to mind, because the vest fabric had fringed selvages, which I had used to frame the paper pieced block.  So before I cut the white fabrics for the FMQ sandwiches,  a wide strip of fringed selvage had to be cut off each edge to save for framing.

It was time to pull out some past samples of FMQ.  They were passable, and I felt I could do that well or better with a little practice.  Unfortunately, the darning foot with my newer machine did not work well.  It seemed to drag and keep the fabric from moving smoothly.  The FMQ was so unsuccessful it had to be abandoned.  

Instead, paper piecing is going to be my May For Me activity, using that favorite block, and maybe some others.

Our Arizona springtime has been pleasantly comfortable this year.  Soon, however, we'll be moving into summer with warmer days that find us retreating indoors.  I'll be working on larger projects such as this table mat and quilt top.
I once joined a bear paw swap and ended up with an assortment of blocks.  I decided one would make a pretty table mat, so I added an orange frame and turquoise backing.  I wanted to use a wrap around binding to form a turquoise border.  I found a video tutorial to learn how to do the wrap around and developed it further to accommodate the added frame and border.  Here’s how it turned out.


Eight of the other blocks from the swap were colors that would coordinate for a quilt top.  My stash yielded fabric for one more block to make a tic tac toe arrangement.  But first, I had to add background fabric to some blocks to make them a uniform size.  The blocks which should be 14 ½” ranged from 14 ¼” to 15”.  I had procrastinated about doing that, but finally decided I wanted those handsome blocks in a quilt that people could enjoy and maybe not even notice the minor irregularities all that much.  I decided to add a frame strip in cranberry red around each block and use a strawberry red print for wide sashing.  And so it became my Bear Paws and Berries quilt top.


Now I look forward to seeing what others have been doing during May For Me 2015.  And thank you, Marcia, for allowing me to share in your event this year.

------------------------
Thank you Carolyn for sharing a post on my blog. I love reading about what others are doing and sharing.

You can leave a comment here and I will forward them to Carolyn.

Do you want to share a post about what you are doing? You can share links to your business and groups and all the places you share!  Please email me your post and photos and I will share them throughout the year .... not just in May!  Marcia@craftysewing.com

Enjoying May, one day at a time...

Marcia

Thursday, May 14, 2015

A May for Me Guest Post!

Hi, I am Holly from


HollyCraft Originals


Handmade Fabric Appliques and More!


I love to make cards, scrapbook, quilt and try new things in crafting. I am a work at home mom of 2 kids.

I joined Etsy on July 24, 2007. My favorite materials are cotton, cardstock, ink, rubber stamps, fabric, buttons, embroidery floss, vintage cotton, recycled denim and corduroy.

I am bringing quality fabric embellishments and accessories from my home in West Michigan to everyone out there seeking fun and unique handmade products. My goal at HollyCraft Originals is to provide my customers with original designs that they can use and that will inspire them to create.


If you name a craft, I have probably tried it. I have been crafting as long as I can remember, with my Mom as my biggest influence.


During the scrapbooking phase of my crafty endeavors, I was in search of some fabric flowers. When looking for them, there didn't seem to be many choices and what I found seemed expensive...so I decided to make my own.


I had tried selling online with other things, like crocheted hats, cards...but nothing seemed to sell much. Then I started putting my fabric flowers in my Etsy store. From there, I created many other designs and had finally found a niche.


I make fabric embellishments/appliques/patches (whatever you want to call them) mostly from upcycled fabrics along with fabric leftover from other projects. All of them are cut out by hand and sewed by hand. When I run out of fabric there may be no more! This makes my appliques one of a kind. 


I am very thankful I get to work at something that I love doing.


My clown fish. I had fun making the little denim bubbles on this one.


This was a drawing my niece did of her mom baking cookies. I had to turn it into an applique and put it on an apron. So fun! Such a nice gift.


A custom made Train T-Shirt.


My son made a drawing of two monsters. Here is the photo of one of the monsters. Then I made the monster appliques.


Here's another example of special orders. The unicorns and mouse were made to match fabrics.


I have a "thing" for owls! When I was looking through my photos for this post, I found several of owls.


 Available at HollyCraft Originals - Etsy Shop

I love to do custom orders. Many of my appliques are made because someone has asked for a certain applique design.


Marcia asked me to share all the links to HollyCraft Originals!


Website:

www.hollycraftoriginals.com


www.facebook.com/hollycraftoriginals

__HollyCraft_ on twitter

@hollycraftoriginals on instagram

www.etsy.com/shop/hollycraftoriginals


Marcia ordered several appliques to create a one of kind original "Grandmama Book" for using when she talks on Skype with her grandson, who lives in Belgium.  It makes it fun to interact with their own personalized book!


She just ordered more appliques to add to the book.


Thanks Marcia for having me as a Guest Poster! I enjoyed sharing my story.

Holly

------------
You can leave a comment here and I will share them with Holly.  When you go to her website check out the video!

Thanks Holly for sharing your story!

There will be more Guest Posts this month.  If you would like to guest post, send me an email and you can share too!

Marcia@craftysewing.com 

Enjoying May, one day at a time...

Marcia 

P.S. My favorite applique is the Kiwi, because I love to hear my grandson say "kiwi" and smile. He loves them as much as I do!  It is really my favorite one, because I love the detailed stitching.


Thursday, May 7, 2015

A May for Me Guest Post!

Hi everyone!  This is Kim Lapacek, artist and dreamer over at PersimonDreams.blogspot.com.  I’m so excited to be sharing my story with you on Marcia’s blog today.


My story is that I love to create and I always have.  I’ve been at it since I was a little kid.  I sewed my very first quilt by hand when I was just 5 years old.  I took the rags out of my mom’s rag bin and sewed them all together for my brother for his birthday – it even included the furry toilet seat cover!!! 

When I was in college I met my future husband and we went to dinner at his mother’s house.  I looked around and could see she was crafty like me and I thought to myself, “This woman is going to like me.”  And it’s true!  We’ve gotten along from Day 1.  My mother-in-law, Diane Lapacek, is an amazing quilter and teacher.  I started my quilting lessons on Tuesday nights.  Diane would give me a lesson AND make us dinner!  (and to a college kid – a real, homemade dinner is pretty much the best thing ever!).  It wasn’t long before I was hooked.


And now it’s 11 years later and I’m still a quilting fool!  I have to admit that the majority of my sewing and quilting is for me.  I don’t really take much commission at this time because I have three young girls – Mercedi, 8, Capri, 7 and Pip, 4 – that take up my life (in a good way).  So – when I do get to sew and quilt – I want to be making something that I’m dreaming up!


My biggest event of the year is Project QUILTING.  http://www.kimlapacek.com/featured-products.html  Project QUILTING is a challenge I run on my blog.


A typical season of Project QUILTING goes from January through March each year.  A challenge goes up on a Sunday and you have ONE week to make and finish a quilt that fits that challenge!  Since Project QUILTING began in 2010 – 1,163 quilts have been started and finished during the week of a challenge!  AND I've gotten to talk with Nancy Zieman about Project Quilting on 'Sewing with Nancy'! http://video.wpt.org/video/2365313401/


This year I’m running a special ‘Off Season Challenge’ – Focus Through the Prism.  It just started this month and there’s still time for you to join in the fun – just head over to here - 
http://www.persimondreams.blogspot.ca/2015/04/focus-through-prisma-project-quilting.html to find out more about the challenge! If the week deadline I talk about above scared you - don't worry, you get a month to start and finish your quilts! 

Website:  www.KimLapacek.com

Blog:  www.PersimonDreams.blogspot.com

Facebook: www.facebook.com/PersimonDreams and www.facebook.com/ProjectQUILTING

Twitter: @PersimonDreams

Instagram: www.instagram.com/PersimonDreams

Photo's other than the ROYGBIV bundle picture taken by Karmen Lindner Photography:  https://www.facebook.com/profile.php?id=53316167103&fref=ts

----
You can leave a comment here and I will share them with Kim. Or you can hop over to Persimon Dreams and leave a comment there.  Kim continues to inspire me and many others!

Thanks Kim for sharing!

There will be more Guest Posts this month.  If you would like to guest post send me an email and you can share too!
Marcia@craftysewing.com

Tuesday, September 30, 2014

Til Death Do Us Part Quilt - Guest Post

Hi! I'm Trisha Frankland aka Quiltchicken (www.quiltchicken.com), and Marcia asked me today to guest blog about my quilt 'Til Death Do Us Part.


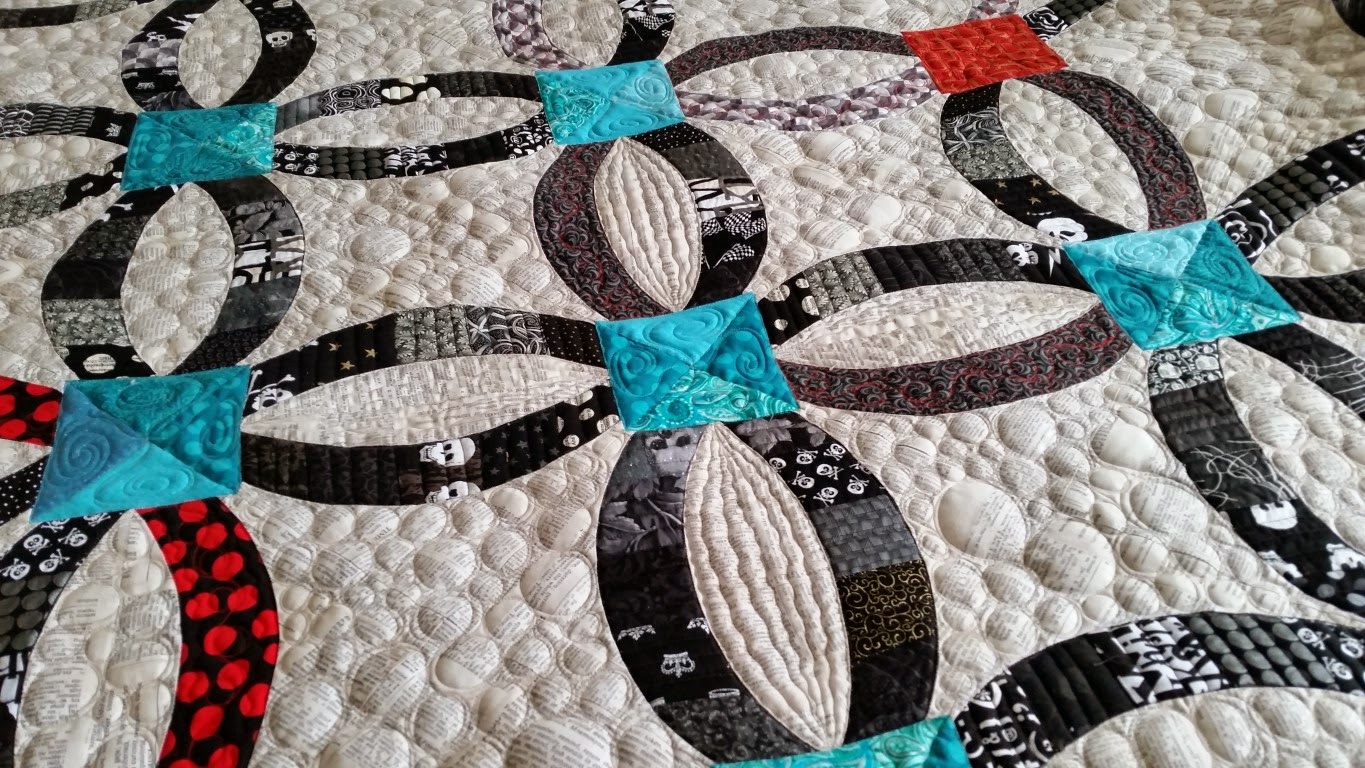
This quilt is 95" x 100" and was free-hand custom quilted by Marcia Wachuta. The quilt is based on the Metro Rings pattern using the Quick Curve Ruler by Sew Kind of Wonderful, but I extensively changed and improvised to make this quilt design unique and personal.

I began this quilt in May 2013 when Maddie Kertay of the Bad Ass Quilters Society (www.badassquilterssociety.com) announced there would be a special BAQS exhibit at the AQS show in Chattanooga in September 2014.

I knew I wanted to make something special to enter in the exhibit, and I took a bit to think on what the BAQS mission means to me. Maddie began the BAQS as an online counterpoint to all the mean attitudes and spiteful venom sometimes found in quilting - the appliquers don't like the piecers, the moderns want to distance themselves from the traditionalists, and everybody gets weird about the art quilts. 

You can go to the BAQS website and read the official manifesto, but essentially to me it boils down to this: Follow whatever muse calls, and we'll cheer you on.
 
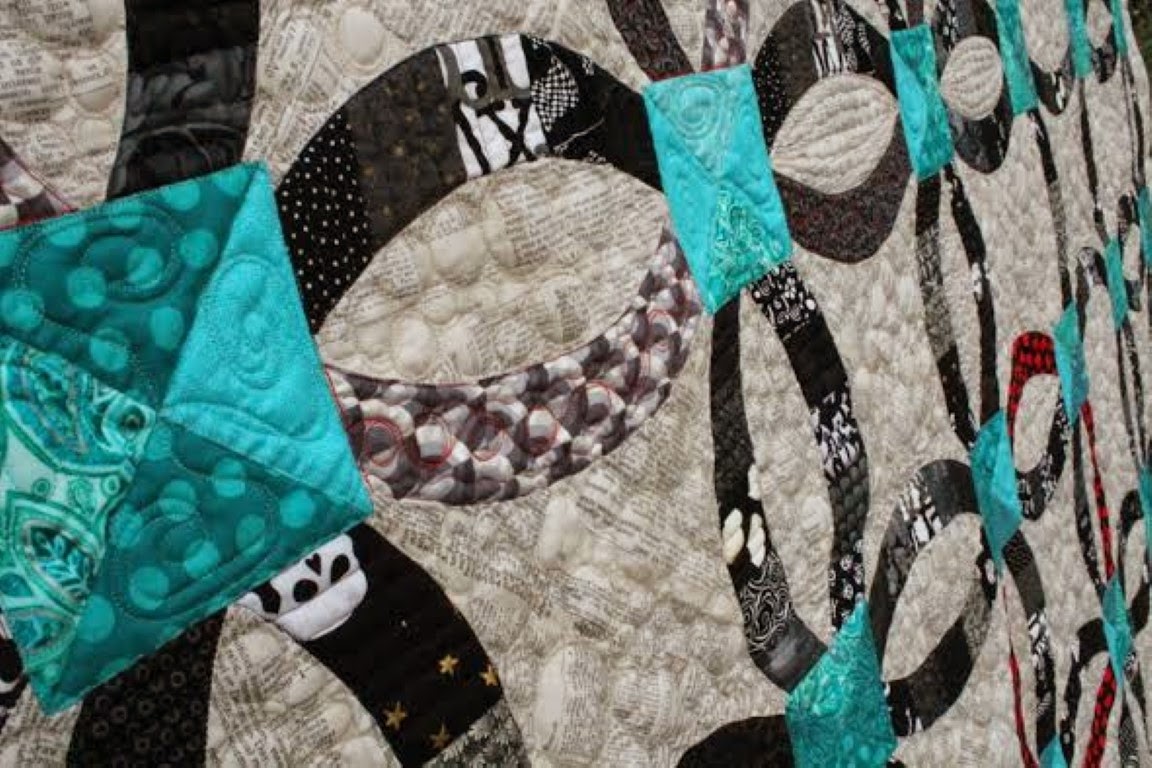
In creating this quilt, I threw traditional convention out the window and instead focused on what my heart wanted. Where traditionally a wedding ring quilt is bright and light, this one is grungy and rock 'n' roll.


The asymmetry and interrupted rhythm are meant to stop you in your tracks, to make the viewer slow down to look closer and investigate the carefully chosen themes. Nearly every fabric holds meaning to me - including the dozens of skull fabrics I've been hoarding since I began quilting in 2000 - and many others incorporate symbols of my marriage, career, and personal interests. I'm a 8.5 year ovarian cancer survivor, and several of the teal fabrics are from Blank Fabric's ovarian cancer awareness line.


At every opportunity, I did NOT what a judge or another quilter would want - I did what made me laugh, what tested my skills, and what would make me proud in the end. It's very liberating to make a quilt that way - and then also a little scary to put it out there in the world when it reveals so much about you!


I sent Marcia several sample rings to test quilt before we tackled the final piece. She worked out several concepts for the ring  s, a handful of accent ideas, and multiple options for the background areas. Ultimately, nearly every one of Marcia's ideas were implemented in the final quilting - we used those shifts and changes to complement the piecing's intentional anomalies.


We tried different batting layers too.  We selected two layers. The bottom layer, 80/20 batting and poly batting as the top layer.


Marcia and I completed the quilt in June 2014, and I submitted photos for the exhibit. Ultimately, there were enough quilts entered that a second BAQS show was added to the AQS Des Moines show, too.


A view of the labels and the back side of the quilt.


My quilt did get juried in and was assigned to the Chattanooga show. I took a week's vacation to go and see my quilt hanging there.


I was already bursting with pride, but you'll just have to imagine my reaction when I discovered that the AQS used my quilt's image on the exhibit poster and in the show guide!! (There are not enough exclamation points in the world for that sentence.)


The whole experience has been so positive for me. I had a wonderful time explaining my vision to show attendees, I got to meet several other quilters with BAQS quilts. The quilt got a lot of attention and support, and my feet hardly touched the ground all week.

I'm ready to put this quilt in more shows, and I'm ready to make more quilts that make my heart happy. 

Because isn't that really what it's about - making something that makes us happy?

Trish
aka Quiltchicken (www.quiltchicken.com)