

Thoughts and photos shared by me ... Marcia. I am a professional modern freestyle long arm quilter and a fiber artist, a photographer, and a novice gardener. I love to create quilted items using old and new fabrics. I am also a mother, a daughter, a friend, a wife and a Grandmama! I am a blogger and I share it all here... Welcome!
Wednesday, August 31, 2011
Tuesday, August 30, 2011
The Comfort of a Quilt and the Comfort of a Friend...
Took a few photos of Gabby and Toby today with their new "doggie blankets" from Tonya. I am caring for Toby for awhile as my Mom recovers from another hospital stay. They love their little quilts! (Updates on my Mom and an Update about what happened to Toby on the same day as my Mom's brain surgery.)
 Gabby and Toby love their doggie blankets! Thanks Tonya!
Yesterday, Tonya wrote about some things I mailed and shared with her. When she mailed Gabby's doggie blanket, she also shared with me... some BLUE fabric (I will show you the BLUE fabric in another post). She had mailed Toby's doggie blanket to my Mom's home much earlier, as we thought he might get out of the hospital sooner and be with my Mom, but Toby had to stay much longer than we thought. He finally got out a week ago. My Mom was back in the hospital a week ago ... So now Toby will stay with me, temporarily.
Tonya not only shared items, but she shares kind words, when I need support. I know she does that for many of us. As I know many of you support others thru' your comments and emails. I know I really appreciate them. It is not just the items you share with others... it's the listening ear, the kind messages and thoughts, and the much needed prayers that are being sent from friends and family that really get you thru' the day... Thanks to all of you for that kindness...
 Looking for treats in the pockets.. and taking a nap!


Toby's taking another nap on his new doggie blanket from Tonya.


Marcia
P.S. I am home and back to work (quilting). I quilted "my vacation project" at the end of the day today! I'll post about it later in the week.


Yesterday, Tonya wrote about some things I mailed and shared with her. When she mailed Gabby's doggie blanket, she also shared with me... some BLUE fabric (I will show you the BLUE fabric in another post). She had mailed Toby's doggie blanket to my Mom's home much earlier, as we thought he might get out of the hospital sooner and be with my Mom, but Toby had to stay much longer than we thought. He finally got out a week ago. My Mom was back in the hospital a week ago ... So now Toby will stay with me, temporarily.
Tonya not only shared items, but she shares kind words, when I need support. I know she does that for many of us. As I know many of you support others thru' your comments and emails. I know I really appreciate them. It is not just the items you share with others... it's the listening ear, the kind messages and thoughts, and the much needed prayers that are being sent from friends and family that really get you thru' the day... Thanks to all of you for that kindness...


Here is where Gabby and Toby sleep at night. I make a little nest out of a fleece blanket at the foot of our bed and Toby sleeps there. Gabby sleeps between my husband and I. The last couple nights Gabby has slept nose to nose with Toby as if she is his Mommy... keeping tabs on him.


Toby's taking another nap on his new doggie blanket from Tonya.

Toby traded his stockinette bandages in for a baby t-shirt today. He wears the 3-6 months size. He needs to still have a covering over the wounds as he heals, but he needed a looser fit covering. I bought the oneies (bodysuit) and cut off the snapped part. He needed them longer to cover his back and sides.

Toby's front legs fit thru' the sleeves and it also stays on better then the stockinette. He has come a long way in the past 6 weeks from the huge bandages and dressings to protect as his horrible wounds as they heal. He had to have multiple surgeries to repair his poor little body.
Thanks to all the wonderful staff at Exceptional Animal Care of Madison, Toby will live a long and happy life.
And again thanks to everyone's for your support and prayers for my Mom and our family. We appreciate it so very much...
Linked with Wordless Wednesday BlogPaws (I know it is NOT wordless, but this is the post that fit for "Wednesday LOVE"! At least there are lots of photos!) Thanks for hopping over here!
P.S. I am home and back to work (quilting). I quilted "my vacation project" at the end of the day today! I'll post about it later in the week.

Monday, August 29, 2011
My Outside Quilt is in Full Bloom!
I returned home last night from another week's stay at my Mom's house and awoke this morning to my Morning Glories in full bloom! There are still lots of buds on them. I expect tomorrow will be even more beautiful. My husband has done a great job of watering and keeping everything growing, as we have had an unusually hot summer in Wisconsin. I love my "Outside Quilt"!


 This is a very good sign....
Remember the post about my first Morning Glories "When your Struggles Gain Strength and Bloom"
It's a positive symbol that there is renewed strength, when you care and comfort someone or something in need...May you find strength each day, in whatever you are doing and don't miss the blooms....They are the parts of life.... that are so important...
Enjoy your day!
Marcia
Linked with:
Southern Daydreamer's Outdoor Wednesday Linky Party!
Friday, August 26, 2011
Scrappy Pot Holders or Hot Pads
You can make these scrappy pot holders by using this simple method of construction. So many of you have said you can't make "random" or "artsy" looking quilts, because it is too hard to figure out where to place the pieces.
First my suggestion is to start with at least 3 to 5 scrap pieces from any odd quilt blocks. For example if you use a leftover block from a quilt, you should rotary cut the block into two or three different size pieces. You will also need some strips of fabric the coordinate with your block colors of various sizes. I like to have light, medium, and dark fabrics. I had these four pieces of the blocks left over from making the denim shirt quilt.
 I placed them on the cutting board and added fabric strips of various sizes in between the pieces and at the ends of the pieces. It is like a puzzle --- matching the pieces together. Placing the lights next to mediums and darks. Lay them out and step back and look at it. Does it look eye pleasing? Move them around or even cut a side off one and move it to the other end. Again step back and look at it.

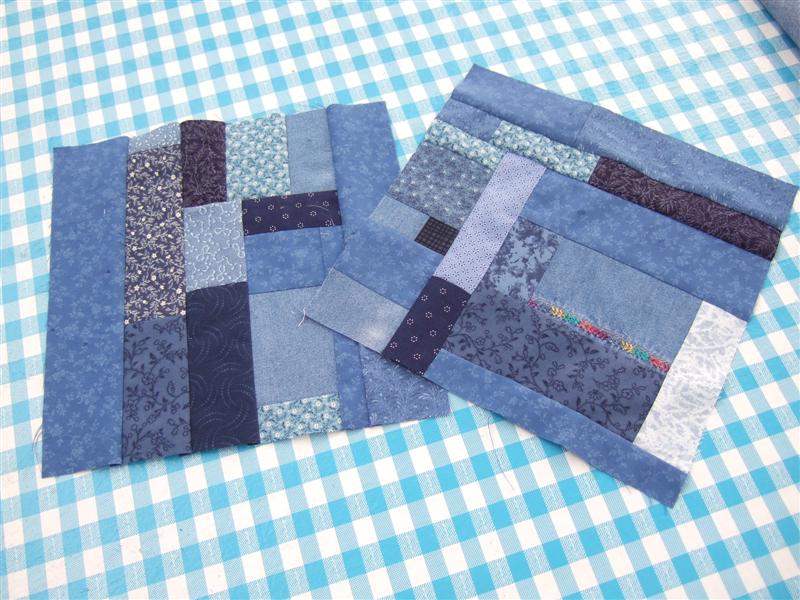
I first sew two blocks of similar size together. Then I sewed the two center strips together. Next sew the long strip onto the two joined blocks. Then sew the 2 sides together and sew more joined strips on the ends.

I added strips to create a rectangle at least 10 inches by 20 inches, so I could split it in half to make two. My rectangle was about 23 inches long by 12 inches wide. I split it in half and trimmed all four sides, so they each measure 10" X 10"square.


My Mom was in the hospital again. I am needed here at her home. I am posting with the photos I uploaded before leaving my home. I realized the photos are not real clear on showing you each step. I think you can get the idea. I will be making more of these projects in the future. I love the random and artsy look!
When I get home (hopefully next week) I will quilt my "Vacation Project" quilt and scrappy hot pads. I will use a heat resistant batting when I quilt the Hot Pads.
Updates on my Mom -- click here.
Enjoy your day!
Marcia
First my suggestion is to start with at least 3 to 5 scrap pieces from any odd quilt blocks. For example if you use a leftover block from a quilt, you should rotary cut the block into two or three different size pieces. You will also need some strips of fabric the coordinate with your block colors of various sizes. I like to have light, medium, and dark fabrics. I had these four pieces of the blocks left over from making the denim shirt quilt.


I first sew two blocks of similar size together. Then I sewed the two center strips together. Next sew the long strip onto the two joined blocks. Then sew the 2 sides together and sew more joined strips on the ends.

I added strips to create a rectangle at least 10 inches by 20 inches, so I could split it in half to make two. My rectangle was about 23 inches long by 12 inches wide. I split it in half and trimmed all four sides, so they each measure 10" X 10"square.
My Mom was in the hospital again. I am needed here at her home. I am posting with the photos I uploaded before leaving my home. I realized the photos are not real clear on showing you each step. I think you can get the idea. I will be making more of these projects in the future. I love the random and artsy look!
When I get home (hopefully next week) I will quilt my "Vacation Project" quilt and scrappy hot pads. I will use a heat resistant batting when I quilt the Hot Pads.
Updates on my Mom -- click here.
Marcia
Wednesday, August 24, 2011

Saturday, August 20, 2011
My Vacation Project Continues ...The Denim Shirt Project!
All of your rectangles should have one strip on one side at this point and are pressed and rotary trimmed.
Note: Denim fabric is woven with a twill weave. It gives a little. It may shift a little when you are sewing. Do not worry about your seams coming out perfectly. It will be a little uneven and that is OK. I like the unevenness of the seams - adds character to the quilt.
This is a fun quilt! Don't match any seams! Just have fun!

 Then sew more blue strips to the pieces onto another side until all of them have a strip on two sides. Press and rotary trim the ends.


 Then sew a strip on a third side of all the pieces. Press and rotary trim.
Sew a strip on the fourth side of all the pieces. Press and rotary trim.
You now have denim squares and rectangles that have strips on all four sides. We will call them blocks from this point on. They are blocks of several sizes. They will look like this:

Group the blocks into piles of similar sizes. Then start to arrange them on a flat surface.
I like to place a bigger block in each row and then add the smaller ones. The smaller ones will have another strip sewed onto one or two of the sides, so they can be sewed onto the larger blocks to complete a row. I sew two smaller blocks together to achieve the right length or width of a larger block.

 I sew some of the blocks together that are a little too big and just trim them off to fit. See how I lay out the rows and later I will trim the longer edges.


 Here's an example of how the ends stick out --- Rotary trim them off, so you have a perfect rectangle and then add borders. I had two strips the same color but different widths and two other blue strips. I stitched them on to all four sides of my quilt top. You will be able to see that the borders are different and you may even be able to see that they are different widths. That is OK! That is what helps make it interesting.

I placed the quilt top on my picnic table. See the borders.
I made hot pads out of the scraps. I will explain the construction process on the hot pads in another post. It's a cool method!
 Day is done at the River... quilt top is done ... and ready for quilting when I get home!


After I quilt my table cloth and hot pads, I will bring it back to the River and take more pictures on the table, so you can see the soft and subtle dimension the quilting gives the denim fabrics.
I will fold up my finished quilt top and hot pads and put it away, until I get home! Stay tuned for another post next week, after I quilt and finish up "My Vacation Project" ---The Denim Shirt Project.

Now I will start cutting the blue shorts apart ...

Enjoy your day!
Marcia
Note: Denim fabric is woven with a twill weave. It gives a little. It may shift a little when you are sewing. Do not worry about your seams coming out perfectly. It will be a little uneven and that is OK. I like the unevenness of the seams - adds character to the quilt.
This is a fun quilt! Don't match any seams! Just have fun!


Sew a strip on the fourth side of all the pieces. Press and rotary trim.
You now have denim squares and rectangles that have strips on all four sides. We will call them blocks from this point on. They are blocks of several sizes. They will look like this:

Group the blocks into piles of similar sizes. Then start to arrange them on a flat surface.
I like to place a bigger block in each row and then add the smaller ones. The smaller ones will have another strip sewed onto one or two of the sides, so they can be sewed onto the larger blocks to complete a row. I sew two smaller blocks together to achieve the right length or width of a larger block.


I placed the quilt top on my picnic table. See the borders.
I made hot pads out of the scraps. I will explain the construction process on the hot pads in another post. It's a cool method!


After I quilt my table cloth and hot pads, I will bring it back to the River and take more pictures on the table, so you can see the soft and subtle dimension the quilting gives the denim fabrics.
I will fold up my finished quilt top and hot pads and put it away, until I get home! Stay tuned for another post next week, after I quilt and finish up "My Vacation Project" ---The Denim Shirt Project.

Now I will start cutting the blue shorts apart ...

Enjoy your day!
Marcia
YES! I Won! And so did Kim! YES! She Won!
First What did Kim win?
A hardcover Sewing A to Z Book! Yes!


AND Aurifil Thread !
YES!
Here is the link to the post at
Sew We Quilt about the contest and the prizes !
You too, can win
and guess what? Kim and I can win again and again! No kidding!

I won a pair of Embroidery Scissors from Hamilton Sewing! Not the roses---They are just for the pictures!---The wonderful scissors below the flowers! YES!
 P.S. YES I am working on "my vacation project" --- pictures coming later today or tomorrow...
A hardcover Sewing A to Z Book! Yes!


AND Aurifil Thread !
YES!
Here is the link to the post at
Sew We Quilt about the contest and the prizes !
You too, can win
and guess what? Kim and I can win again and again! No kidding!

Do you want to win too! See the sidebar logo links to get registered and enter too!
Enjoy your day!
Marcia
 P.S. YES I am working on "my vacation project" --- pictures coming later today or tomorrow...
And yes I am relaxing and enjoying my vacation!
Wednesday, August 17, 2011

Tuesday, August 16, 2011
"Up Cycle This Denim Shirt" ---- My Vacation Project!


First cut the shirt apart. Cut along the seams of the shirt and the sleeves. Save all usable parts of the shirt.


I chose blue cotton fabrics to blend my denim. I cut them into strips of various sizes from 1 3/4 inches to 3 inches.

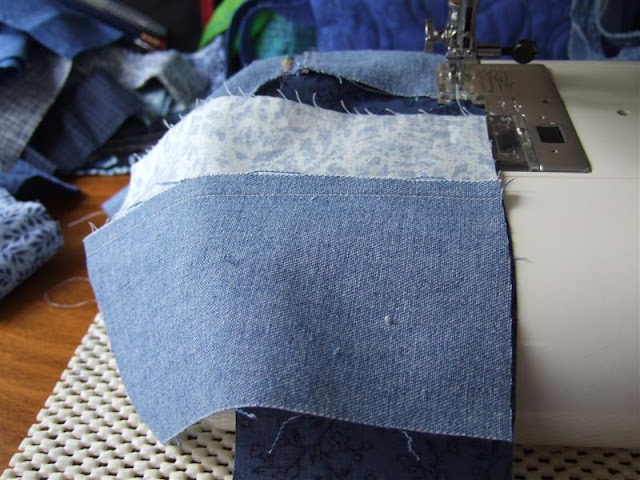
Take one strip and start sewing them onto one side of the denim pieces.
Take another color of fabric and sew it onto some more of the pieces.
And another strip until you have sewn strips on one side of all the denim pieces.
Trim with a rotary cutter. Press seam allowance towards the strip and away from the denim.


Your denim pieces should look like this. They should have one strip on one side of each piece. Press and trim so you are ready for the next step.


I will probably post daily, but remember I am on vacation, so it may be every other day. My daily posts will be jiggled around to make adjustments for the posts.
My inspiration for the project is from this month's Project Quilting Challenge.
Click here to see what the shirt looked like before I cut!
Watch for future updates on the Blue Patchwork Shorts --- My next "Up Cycle Project"!
Thanks for following along!
Marcia
Subscribe to:
Posts (Atom)