Sunday, October 30, 2011

Thinking Outside the BLOCK! A Mystery Quilt - Project Number 12

I took all the pieces out of the bag and started sewing, again. Looked like I only had 4 more blocks to complete. I have been working on this quilt on and off for a couple years.  So I was on a mission to finish it this time.
I was stitching along, making great progress. It was Minutes for Me: 15 minutes on Wednesday night and 25 minutes on Thursday night.  My husband fell asleep in the chair on Friday night, so I stitched for about an hour! I pressed the center intersections of my four patches. It made them lay nice and flat.  
Didn't feel good on Saturday, as I had my flu shot on Thursday afternoon.  I always swell up at the site of the shot. I took an antihistamine on Friday night to help with the reaction.  I moved kinda slow, but I managed to sew on and off all day Saturday. I even got four loads of wash done and our sheets changed! Pretty good.
It was looking great!  I was so pleased. At this point it looked like I had enough pieces cut to form another row, so I kept sewing...
I had to individually make some four patches to create three more blocks.  
Cool all the blocks were complete! Yippee!   I was so happy!
Oh no... some of them don't line up!
Oh no... some of them are bigger and some of them are smaller! 
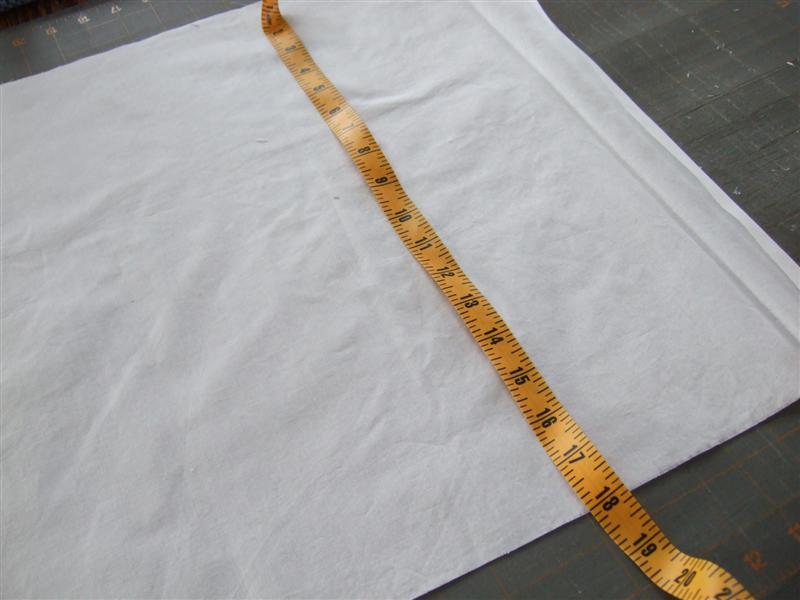
I could not just square up the blocks at that point, because the seams won't match up when I sew them together! There is almost a 1/2 inch difference in the sizes!  Oh no!
I do know why this happened.  
Let me explain... 
This quilt has been taken out of the bag about 5 different times during the past 3 years. Each time I sewed a few blocks together and used a different sewing machine.  I have three sewing machines.   
My first Janome sewing machine is 15 years old and I love it the best.  It has even "almost died" twice! The second time it almost died, was when it locked up completely. I cleaned and oiled it and was going to give up on it. Before I put it away, I tried moving the hand wheel one more time and it moved! I have now been sewing on it for the past two years.  I use it as my camper sewing machine.  It is a Janome 4000 and I love it!
I also have a Janome 6500. I love this machine too. I don't always take it to a retreats as it is too heavy.  It usually sits on my dining room table.  It is perfect for stitching bindings on customer's quilts to spread out the whole quilt on the big table.  I sew my 15 minutes at a time on it too - Minutes for Me!  This machine is about 7 years old and runs like a charm!
My third sewing machine is a Janome 3000.  I bought it when my Janome 4000 almost died the first time, about 10 years ago.  My 4000 sewing machine was in the shop for more than a week (something was wrong with the bobbin casing). I needed a sewing machine, but I couldn't afford to buy another 4000 machine, so I bought a step down version of it.  I like my Janome 3000 sewing machine and I take it to retreats, as it is lighter then the 6500. It sews great. So far, no problems with it, but it also doesn't have all the hours of sewing that the 4000 and 6500 sewing machines have on them.  Those minutes add up fast when you sew all the time!
I did not include a photo of the Janome 3000, as it looks just like the Janome 4000, only it has less embroidery stitches.
So needless to say at this point, every time I took the mystery quilt out of the bag to sew, I used a different sewing machine, depending on where I was --- at home in my dining room, at a quilt retreat, or at the River in our camper.
I know you are suppose to start and complete a quilt on the same machine, even if they are the same brand and you use the same 1/4 inch foot, you still shouldn't switch machines.
But I did! 
Now I have a problem...  

What are my choices?
  • Put the blocks back into the bag and never take them out the bag again.  Then when I die someone else can figure out what to do with them. This would be an option, if I didn't like the colors, but I love the colors.
  • Stretch, press, starch, and pull each block.  Then stretch as I stitch them together and try to make them fit.  That is not a choice for me, as it will not look good!
  • Make two little quilts --- one with the larger blocks and one with the smaller blocks. That's a good choice!
  • Add a new design element using uneven lattice strips and off set them to create a completely different effect.  I like this choice best!
I am going to solve my problem by using creative problem solving, because I can think outside the BLOCK!  
First I will line up all the blocks by size.
The smaller blocks in one row and the larger ones on the next row and then alternate the rows.
I believe even the intersections will still look cool and the original pattern will still flow through the quilt design, thus creating an unusual connection of the blocks. 

I like it!  I like thinking outside the BLOCK!
What do you think?
What would you do?
How have you solved a similar problem?


I cut the strips and started sewing. I will take photos of the process and share the re - construction of my quilt. Tentatively, I plan to have the quilt top complete with photos by Tuesday night and will share it for Hodgepodge Patchwork Tuesday, as tutorial.
You may have had this happen to you and you may want to try it!


Thanks for following along...
Marcia 
P.S. I am planning another type of similar project in January, but this is a quilt top, I started and I do not like the colors or the pattern.  I used a really cool fabric in it, so I am going to completely transform it into a quilt top I will like. 


Linked with:
My Original LIST of UFO's from Oct. 18th
Life in Pieces: 15 minute Challenge Tuesday - Nov. 1, 2011
Today's Creative Blog: Get Your Craft On Tuesday - Nov. 1, 2011
My Uncommon Slice of Suburbia: Tuesday's Treasures - Nov. 1, 2011
Freshly Pieced Work In Progress Tuesday Nov. 2, 2011
Savy Southern Style: WOW Us Wednesday - Nov. 2, 2011
Somewhat Simple: Strut Your Stuff - Nov. 2, 2011
It's Sew Stinkin Cute Linky Party-Nov. 3, 2011
Picket Fence: Inspiration Friday - Nov. 4, 2011
2805 Potpourri Friday - Nov. 4, 2011
Quilting in my Pyjammas: Favorite Things Friday - Nov. 4, 2011
My Repurposed Life: Catch as Catch a Can 51 - Nov. 4, 2011
Confessions of a Fabric Addict: Can I Get a Whoop Whoop? - Nov. 4, 2011
Roca and Company: You ROCK #8 - Nov. 4, 2011
Stuff and Nonsense: fridays unfolded #40 - Nov. 4, 2011
Homemaker in Heels: Weekend Craft Soiree and Blog Hop - Nov. 5, 2011
Sew Many Ways: Sew Darn Cute #39 - Nov. 6, 2011
Pieceful Life: Little Quilt Monday - Nov. 7, 2011 (I linked here, because this can even happen when making mini quilts - so I shared my solution.)
Sew Happy Geek: Manic Monday - Nov. 7, 2011
Canoe Ridge Creations: Sew Modern Monday - Nov. 7, 2011
Chef in Training: Tuesday Talent Show - Nov. 8, 2011

Friday, October 28, 2011

"Quilts for a Cause" are quilts that you create from your heart...

My Mom and I made this quilt and donated it to The Fireside for one of their fundraisers for Rainbow Hospice. The Fireside raffled this quilt to raise money for the Family Room at Rainbow Hospice in Johnsons Creek, Wisconsin.  It has been on display at the Fireside in Fort Atkinson, Wisconsin.  The drawing was yesterday and the winner is Susan Kramer of Helenville, Wisconsin.  
Through the quilt raffle sales, they raised $2,904. The Fireside will donate the money to Rainbow Hospice for the kitchen and snack bar within the family rest and relaxation area. 
Every year, since 1997, Mom and I together create a donation quilt in memory of my Dad, Dan Nordeen.  We have since added in memory of Blanche Anderson, my sister-in-law's Mother.
The pattern we used is a courthouse round block.  Mom and I chose blues and greens for the colors.  Of course we both love blues. Last fall, Mom pressed and starched all the fabrics and I rotary cut all the strips.  Then Mom picked out each color for each round of the block.  She put them on a paper towel and placed them in a pizza box.  I sewed only 3 blocks at a time, so I didn't get any of the strips mixed up!


 We chose a stripped fabric for the lattice.
I quilted with free style Overall Swirls.  It softens the sharp straight lines of the blocks.  I finished the quilt with an all machine embroidery stitched binding.


We have already chose our colors for the next quilt and we will start pressing and cutting the fabric later this fall. Mom will plan out the blocks.  I will do the sewing this winter, so I can quilt it by March or April.


Some day soon, (maybe next week), I will post about all the quilts my Mom and I have made together over the years for "Quilts for a Cause".  I am still searching some old albums for old photos to scan into the computer.  I am adding them to the photo gallery as I find them.


There are a couple of the "Quilts for a Cause" currently on my blog and website:
Relay for Life Quilt 2009
Passage Quilt for Rainbow Hospice
Comfort Pillows for Rainbow Hospice
A Signature Quilt for Kathy
Hearts from all over the World Quilt


"Quilts for a Cause" are quilts that you create from your heart...


I entered photos of this quilt in a Blogger's Quilt Festival at Amy's Creative Side Oct. 28, 2011


Enjoy your day!

Tuesday, October 25, 2011

Save and Reuse Those Plastic Grocery Bags! - Hodgepodge Patchwork Tuesday

This Tutorial is now available as a PDF Downloadable Pattern for Only $2.00 at Craftsy.com  -- Plastic Bag Dispenser.


How to make the Plastic Grocery Bag Dispenser.
Supplies: 
one piece of fabric 28" X 18" 


 fabric strap 4" X 16"

 9 1/2" piece of elastic 3/4"wide and a large safety pin
Press/Iron the top edge and the bottom edge first 1/4 inch under.
Then press/iron 1 1/2 inch for the top hem and bottom casing.
Stitch as shown in photo on the top and bottom.

Attach the safety pin to the elastic and insert the elastic in the casing on the bottom edge of the bag.

 Insert part way in the casing until the edge meets the ends of the casing and stitch it.
 Continue to feed the pin with the elastic thru' the casing.  
 When it gets to the end, remove the pin and stitch it.
Place "Wrong" sides together, so the pretty side of the fabric is out.  I know you can't tell which side is the pretty side or the wrong side, because I chose white for the fabric, but you will know with your fabric. We are going to make a french seam so that is why you need to have the wrong sides together to stitch the first seam.
 Pin and stitch with a scant 1/4 inch seam allowance.


Trim the elastic ends even with the seam allowance - a scant 1/4 inch.
 Turn inside out, so the pretty side of the fabric is on the inside.


Press/iron the outside of the seam flat so you can seam it again on the other side. We are going to create a french seam, so there are no raw edges.
If you look closely you can see the first seam under the presser foot.  Stitch with a 3/8 inch seam allowance so the seam encases the raw edges of the other seam inside. 

Turn right side out.


Notice there are no raw edges inside the bag at the seam allowance.
 Strap - Press under both ends 1/4 inch.
Press/iron in half with the pretty side of the fabric together.
Stitch the raw edges with a seam allowance of 1/4 inch the length of the strap. Do not stitch the ends.  Leave them un stitched and open.

Turn inside out using a safety pin.


 Press/iron flat with the seam in the center.
Pin to the inside of the bag at the seam allowance as shown.

Stitch the strap to the bag as shown in the photos.


 May not come out perfectly straight as the seam is thick. If you use a matching thread it won't show like the tan on the white fabric.

 I used white fabric with tan thread for the tutorial so you can see it clearly. I would suggest a colorful fabric with matching thread for your bag.

 These are the bags I made for my Mom. 

If you have any questions please leave a comment or email me at Marcia@craftysewing.com.
The bags make great gifts, as we all reuse and recycle.


Enjoy your day!


Marcia


Linked with:
Life In Pieces: 15 Minute Challenge - Oct. 25, 2011
Today's Creative Blog: Get your Craft On Tuesdays - Oct. 25, 2011
My Uncommon Slice of Suburbia: Tuesday's Treasures - Oct. 25, 2011
Somewhat Simple: Strut Your Stuff - Oct. 27, 2011
The Thrifty Groove: Thrifty Things Friday - Oct. 26, 2011
At Picket Fence: Inspiration Friday - Oct. 27, 2011
2805: Potpourri Party #9 - Oct. 27, 2011
Stuff and Nonsense: fridays unfolded - Oct. 27, 2011
My Re Purposed Life: Catch as Catch Can # 50 - Oct. 27, 2011
RoCa and Company: You ROCK #7 - Oct. 28, 2011
Homemaker in Heels: Weekend Craft Soiree and Blog Hop - Oct. 28, 2011
Sew Chatty: Made with Love #50 - Oct. 31, 2011
Canoe Ridge Creations: Sew Modern Monday - Oct. 31, 2011
Sew Happy Geek: Manic Monday Linky Party- Oct. 31, 2011
Coastal Charm: Nifty Thrifty Tuesday - Nov. 1, 2011
Chef in Training: Talent Show #10 - Nov. 1, 2011
Idea Room: Linky Party #5 - Nov. 3, 2011